How to Pack Efficiently for Any Trip as a Solo Traveler

I still remember the absolute panic of packing for my very first solo backpacking trip across Europe. I was standing in my tiny apartment, staring at a mountain of clothes, three pairs of shoes, a massive first-aid kit, and a hard-shell suitcase that looked like it belonged to a family of four. I tried to force the zipper shut, leaning all my weight onto the canvas until my hands shook. It wouldn’t budge.
When I finally hit the road, that heavy bag became my worst enemy. I dragged it up five flights of narrow stairs in Paris. I dropped it on a wet train platform in Rome. I spent more time worrying about my luggage than looking at the architecture.
Years later, when I quit my rigid corporate 9-to-5 job to travel full-time, I knew things had to change. I worked extra shifts as a New York sightseeing guide and spent months waitressing to save every single dollar for my travels. Carrying less wasn’t just about saving money on airline baggage fees—though that was a huge bonus. It was about my personal freedom, my physical safety, and my peace of mind.
Learning how to pack efficiently for any trip is the ultimate superpower for a solo traveler. When you can carry your own world on your back without straining a muscle, your confidence skyrockets. You stop feeling like a vulnerable target and start feeling like an agile explorer.
Let’s break down exactly how to transition from an overwhelmed overpacker to a free, minimalist solo traveler.
The Psychology of Overpacking: Why We Carry Too Much
Before we touch a single t-shirt, we need to talk about why we overpack in the first place. Overpacking is almost never about the weather or the destination. It is entirely about fear.
When we pack our bags, we are trying to control the future. We pack for the “what-ifs.”
- What if I get invited to a formal gala while walking through the jungles of Southeast Asia?
- What if it rains for fourteen days straight?
- What if every single pharmacy in the country is closed when I get a headache?
When you travel alone, these fears multiply. You do not have a partner to share the load or lend you a phone charger. You are entirely on your own. So, you pack an extra jacket, an extra pair of boots, and three extra books just in case you get lonely.
Embracing the “Rule of Replicability”
The truth is that people live in the places you are visiting. They wash their clothes, they buy shampoo, and they get headaches too. Unless you are trekking into the deep, unmapped heart of polar ice caps, you can buy almost anything you need on the road.
When I taught English in Thailand, I arrived with a bag full of heavy western medicines and specialized clothing. Within a week, I realized that local pharmacies had incredible, affordable supplies, and the lightweight cotton clothes sold at the night markets in Chiang Mai were far better suited for the heat than anything I bought in New York.
When you learn to trust that the world will provide what you need, your bag automatically loses half its weight. You stop packing for scenarios that will never happen, and you start packing for the daily reality of moving through the world.
Choosing Your Shell: Backpack vs. Rolling Suitcase
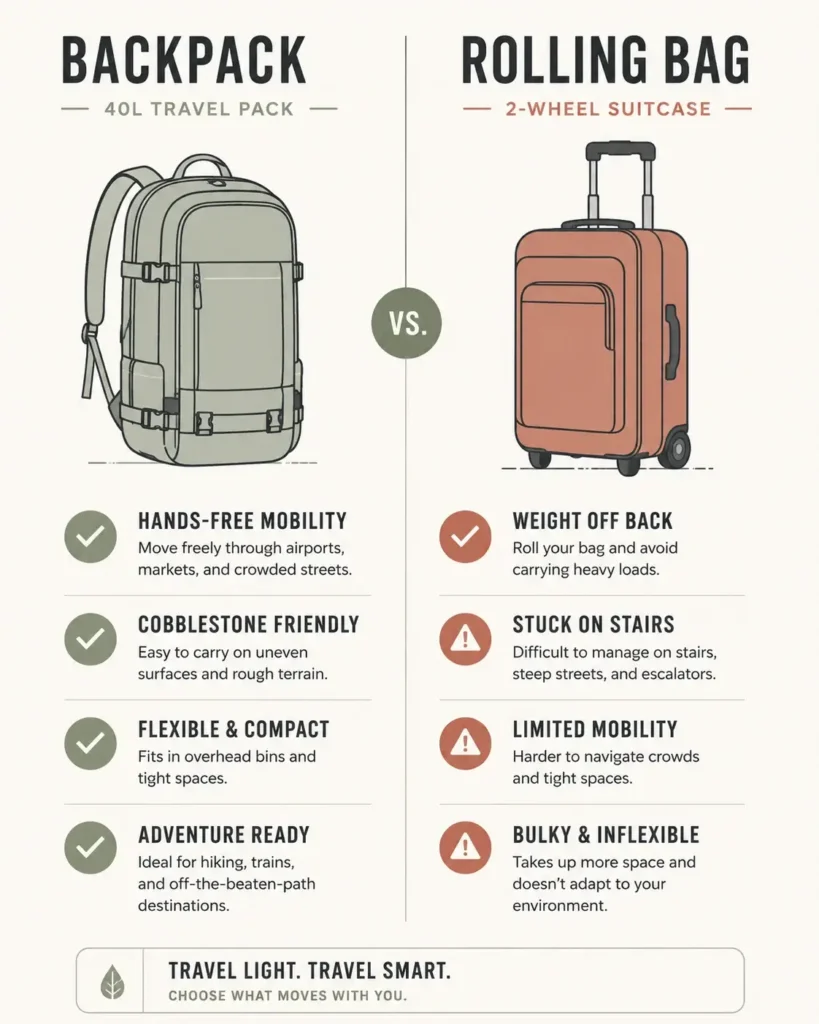
The debate between backpacks and rolling suitcases is as old as travel blogging itself. But when you are traveling solo, this choice becomes a matter of daily logistics and safety.
Why I Choose a 40-Liter Backpack
For ninety percent of my trips, I use a 40-liter, carry-on-compliant backpack. Here is why: mobility equals safety.
If you are arriving at a train station in a new city at 10:00 PM, you want to be able to move quickly. If you have a rolling suitcase, one of your hands is always occupied. You are tethered to a noisy box that rattles against the pavement, announcing your arrival to everyone on the street. If you encounter a broken escalator, a muddy road, or a steep flight of stairs, you are suddenly stuck.
With a backpack, your hands are completely free. You can look at maps on your phone, hold a handrail, or grab a quick snack without looking for a flat place to set your bag. You can walk past a crowded bus stop with ease. More importantly, a carry-on size backpack stays with you. It never gets lost in the belly of an airplane or stolen from a luggage compartment on a long-distance bus.
When a Rolling Bag Makes Sense
There are times when a rolling bag is acceptable. If you have chronic back pain, neck injuries, or physical limitations, a backpack is not worth your health.
If you do choose a rolling bag, look for a durable, two-wheeled model with oversized rubber wheels rather than a four-wheeled “spinner” bag. Four-wheeled bags are wonderful in smooth airport terminals, but their tiny plastic wheels snap off instantly when they hit the rough cobblestones of European old towns or the cracked sidewalks of Central America. Two-wheeled bags roll much better over gravel, grass, and curbs.
The Core Strategy: The Capsule Wardrobe Formula
Clothing is always the heaviest part of any suitcase. The secret to figuring out how to pack efficiently for any trip is mastering the capsule wardrobe. This simply means choosing items that can all be worn together in multiple combinations.

The 5-4-3-2-1 Rule for a One-Week Trip
This is a classic packing framework that works brilliantly for almost any destination. It keeps your choices limited but gives you enough variety to avoid looking identical in every photo.

- 5 Pairs of Socks and Underwear: These are small, easy to wash by hand in a hotel sink, and dry quickly overnight.
- 4 Tops: Choose a mix of short-sleeve t-shirts, tank tops, or long-sleeve buttons depending on the climate. Every single top must match every single bottom.
- 3 Bottoms: One pair of durable long pants, one pair of lightweight linen pants or skirts, and one pair of comfortable shorts.
- 2 Pairs of Shoes: One pair of high-quality, supportive walking sneakers and one pair of versatile sandals or nicer flat shoes.
- 1 Jacket or Outer Layer: A lightweight rain jacket or a warm fleece that can layer over your tops.
Fabric Choice is Everything
When you buy clothes for travel, ignore the brand name and look at the fabric tag inside the collar.
Avoid heavy cotton. Cotton absorbs sweat, holds onto odors, and takes days to dry in humid environments. If you wash a heavy cotton t-shirt in your hostel sink in Bangkok, it will still be damp and smelling like mildew two days later.
Instead, invest in these three travel-friendly fabrics:
- Merino Wool: This is the absolute king of travel fabrics. It regulates your body temperature, keeps you cool in summer and warm in winter, and naturally resists odors. You can wear a high-quality merino wool shirt three or four times without it smelling. It is expensive, but it pays for itself because you need to pack fewer clothes overall.
- Linen: Perfect for hot, conservative regions where you need to keep your skin covered but want to stay cool. It wrinkles easily, but that is part of its casual charm.
- Synthetic Blends (Nylon/Polyester): These are lightweight, highly durable, and dry in a matter of hours. They are excellent for active days, hiking, or humid tropical climates.
The Power of Packing Cubes and Compression
If you are not using packing cubes, you are missing out on the greatest organizational tool ever invented. Packing cubes do not actually reduce the physical weight of your clothes, but they completely transform how that weight fills your bag.
How to Use Packing Cubes Correctly
Instead of throwing your clothes loosely into your backpack, you categorize them into separate mesh fabric zip containers. I use three cubes for my trips:
- Cube One (Large): Pants, skirts, and long layers.
- Cube Two (Medium): T-shirts, tops, and dresses.
- Cube Three (Small): Socks, underwear, and swimwear.
When you use cubes, you never have to unpack your entire bag to find one clean sock. You simply pull out the small cube, grab what you need, and slide it back in. It acts like a portable dresser drawer system inside your luggage.
The Rolling Method vs. The Folding Method
To get the most out of your packing cubes, stop folding your clothes flat. Folding creates pockets of empty air between layers and causes deep crease lines.
Instead, use the rolling method. Lay your shirt flat, fold the sleeves inward, and roll it tightly from the bottom hem up to the collar like a small burrito. Pack these rolls tightly next to each other inside your packing cube. This method compresses the fabric fibers, minimizes deep wrinkles, and allows you to see every single item at a single glance when you unzip the cube.
Maximizing the Space in Your Toiletry Kit
Toiletries are notoriously heavy because liquids are dense. They are also a major source of stress at airport security checkpoints. To pack efficiently, you must ruthlessly downsize your bathroom routine.
Transitioning to Solid Toiletries
The easiest way to beat the airline liquid limits is to eliminate liquids entirely. Solid toiletries are a total game-changer for solo travelers.
A high-quality solid shampoo bar takes up less space than a deck of cards, can last for months, and will never explode inside your bag during a bumpy flight. You can also find solid conditioner bars, solid face wash sticks, and even dehydrated toothpaste tablets that activate when you chew them.
The Tiny Container Trick
If you must bring liquid products, never bring the full-sized bottle, and avoid buying those expensive “travel-sized” items at the grocery store, which are often a waste of plastic. Instead, buy a set of small, reusable silicone squeeze tubes.
Label them clearly with a permanent marker so you do not accidentally put conditioner on your face in a dark hostel bathroom. Remember that you only need enough product to last you for the first week or two of your trip.
When it comes to staying healthy abroad, your packing list should focus on essentials rather than entire medicine cabinets. For specialized health guidelines, it is always wise to consult the CDC Travelers’ Health site for specific vaccine requirements and regional food safety tips before you finalize your medical kit. A basic blister kit, some rehydration salts, and a small strip of pain relievers are usually all you need to pack.
Managing Tech and Electronics as a Solo Traveler
As a digital nomad and travel writer, my tech gear is the most expensive and heavy part of my luggage. But even if you are traveling purely for vacation, electronics can quickly take over your bag if you aren’t careful.
The Universal Travel Adapter Rule
Do not buy a separate plug adapter for every country you visit. It is inefficient and expensive. Instead, buy one high-quality universal travel adapter that features built-in USB and USB-C ports on the side. This allows you to plug your laptop into the main outlet while simultaneously charging your phone, your camera, and your power bank from the very same wall plug.
The Lifeline: A Reliable External Power Bank
When you travel alone, your smartphone is your literal lifeline. It holds your offline maps, your train tickets, your hotel reservations, and your emergency contact numbers. If your phone battery dies while you are trying to find your guesthouse in a confusing neighborhood at night, you can find yourself in a stressful situation.
Pack a durable external power bank with a capacity of at least 10,000 mAh. Keep this power bank in your daypack with a charging cable at all times. Never let it run out of juice. It gives you the security to explore distant markets, take long train rides, and navigate unfamiliar transit networks without constant battery anxiety.
Streamlining Cables and Clutter
Gather all your cords, chargers, and memory cards and place them into a small, dedicated electronics organizer pouch. Do not let them tangle loosely in the bottom pockets of your bag. Use simple velcro cable ties to keep each cord coiled neatly. This protects the delicate internal wiring from snapping and saves you from the frustration of untangling wires when you just want to charge your device after a long day of walking.
Packing for Safety and Protecting Your Documents
When you travel solo, your documents are your ticket home. Losing your passport or your primary debit card can turn a beautiful trip into a bureaucratic nightmare very quickly. Packing efficiently means creating systems that protect these items automatically.
The Digital Backup System
Before you leave your house, take clear, high-resolution photographs of your passport photo page, your visas, your travel insurance policy, and your medical cards. Email these photos to yourself, save them to a secure cloud storage drive, and download them so they are accessible offline on your smartphone. If your physical documents are ever stolen, having these digital copies will drastically speed up the process of getting an emergency replacement at an embassy.
Strategic Cash and Card Separation
Never keep all your financial assets in one place. If you carry a single wallet and that wallet gets lost, you have zero money.
Instead, divide your assets into three distinct spots:
- The Daily Wallet: Keep one low-limit debit card and a small amount of local cash for food and transport in a secure zipped pocket or front cross-body bag.
- The Deep Storage: Keep your primary credit card, your passport, and backup cash hidden inside a small security pouch at the very bottom of your backpack or in your room safe.
- The Emergency Cache: Hide a crisp $100 bill and an emergency backup card inside a completely boring, unexpected place in your luggage, like a clean sock or an empty tampon applicator case.
To stay updated on changing entry conditions, safety levels, and travel warnings for any region, I always double-check the US Department of State Travel advisories during my trip planning process to ensure I have the right security mindset.
Step-by-Step Packing Guide: The actual Assembly Process
Now that we have gathered our minimalist wardrobe, downsized toiletries, streamlined tech, and secure documents, it is time to load the backpack. The layout of your bag matters just as much as what goes inside it.

Proper weight distribution protects your spine and makes the bag feel much lighter than it actually is.
Stage 1: The Base Layer (Bottom of the Backpack)

At the very bottom of your bag, place the items you will absolutely not need until you arrive at your accommodation for the night. This includes your sleeping liner, your extra pair of shoes, or your heavy swimwear. This soft base layer acts as a shock absorber if you drop your bag heavily onto the ground.
Stage 2: The Core Layer (Middle and Closest to Your Back)
This is where your heaviest items must go. Your largest packing cubes filled with heavy pants, jeans, or jackets should be placed right against the back panel of the backpack. By keeping the center of gravity as close to your body as possible, you prevent the bag from pulling backward away from your shoulders, which causes bad posture and severe lower back fatigue.
Stage 3: The Outer Layer (Top and Front Pockets)
At the very top of your backpack, place anything you might need to grab quickly while in transit. This includes your light rain jacket, your electronics organizer pouch, and your clear toiletry kit for airport security screeners. If an airport security officer asks you to remove your liquids, you want to be able to unzip the top of your bag and pull them out in three seconds, rather than digging through layers of underwear.
Practical Packing Scenarios: Cold vs. Tropical Climates
The environment of your destination changes your gear profile, but it shouldn’t change the size of your bag. Packing for a snowy winter trip using a 40-liter bag is entirely possible if you change your approach to layering.
The Tropical Strategy: High Humidity and Sun
When you pack for hot regions like Southeast Asia, Central America, or coastal destinations, your biggest enemies are sweat and sun. You want maximum breathability.
Focus entirely on ultralight, loose-fitting clothing. Pack a wide-brimmed hat, high-quality polarized sunglasses, and a lightweight sarong. A sarong is a brilliant multi-use tool for solo travelers; it can be used as a beach towel, an emergency blanket on chilly buses, a privacy curtain for hostel bunks, or a modest wrap to cover your shoulders when visiting local temples.
The Cold-Weather Strategy: The Art of Layering
People assume cold weather requires massive, bulky sweaters that fill up an entire suitcase. It doesn’t. The secret to winter travel is thin, high-performance insulation layers.
Instead of one giant knit sweater, pack three thin merino wool base layers. You can layer a tank top, a long-sleeve merino shirt, a lightweight down jacket, and a windproof outer rain shell. This combination keeps you warmer than a single heavy coat because it traps pockets of warm air between the layers.
More importantly, it is versatile. When you walk into a heated museum, you can shed one layer and stay comfortable, rather than sweating in a heavy sweater.
The Transit Wear Trick
Never pack your bulkiest items inside your bag. When you are boarding an airplane, a bus, or a train, wear your heaviest items on your body. Wear your thickest walking boots, your heaviest jeans, and your warmest winter jacket onto the plane.
Airports and airplanes are notoriously cold anyway, so you will stay warm, and you will save a massive amount of physical space and weight inside your main backpack. Once you pass the boarding gate, you can always take the heavy jacket off and lay it across your lap.
Local Navigation and Moving Lightly on the Ground
Once you arrive at your destination, your main luggage stays at your guesthouse or hostel. Now, your daily comfort depends entirely on your daypack or cross-body bag. Navigating a new city efficiently requires a completely different approach to what you carry on your body.
Choosing the Right Daypack
Your daypack should be small, lightweight, and packable. I love using a 15-liter backpack made of lightweight nylon that folds down into a pouch the size of an apple when it is empty. This allows me to keep it stowed inside my main bag during travel days and pull it out only when I am exploring a city.
Ensure your daypack has durable zippers and water-bottle pockets on the sides. When walking through busy markets, always wear your backpack on the front of your chest to prevent opportunistic pickpocketing. It might look slightly silly, but keeping your eyes directly on your zipper pulls is a fantastic way to deter thieves in crowded transit hubs.
Smart Transport Apps
Before you land in a new country, research how local transportation actually operates. For instance, if you are traveling to Southeast Asia, don’t rely on expensive airport taxis. Instead, familiarize yourself with regional ride-sharing services by downloading the Grab official app ahead of time so you can book safe, fixed-price scooter or car rides directly from your phone without haggling over prices. This allows you to step off the plane with complete confidence, knowing exactly how you will reach your accommodation.
Immersing Yourself in Local Nooks and Food Culture
When you travel with a light bag, you aren’t weighted down by stuff, which leaves you with more energy to seek out authentic local experiences. The ultimate reward of learning how to pack efficiently for any trip is that it removes the barrier between you and the local culture.

How Pack Weight Affects Cultural Exploration
Imagine arriving in a beautiful, historic destination like a hilltop village in Tuscany or a vibrant neighborhood in Kyoto. If you have a massive, heavy suitcase, your only goal is to find your hotel as fast as possible, dump your bag, and collapse from exhaustion. You view the stairs, the hills, and the crowded alleys as obstacles to overcome.
Now imagine arriving with just a light 40-liter backpack. You step off the train feeling fresh. You see an interesting local market right outside the station. Because your bag is light and comfortable, you don’t need to head straight to your hotel. You can wander through the market stalls, chat with a local vendor, and grab an authentic lunch right then and there. Your trip begins the second you arrive, not hours later after you’ve unpacked.
Seeking Out Authentic Local Flavors
When you aren’t trapped in the tourist bubbles created around large luxury hotels, you are free to explore where locals actually eat. To find the best food in any city, walk three blocks away from the main tourist plazas or UNESCO heritage sites. Look for small family-run eateries with short menus and long lines of local residents.
If you are exploring the incredible historic streets of Italy, you can look up official location histories on the UNESCO World Heritage Centre directory to find deep historical contexts, but always rely on your own feet and curiosity to find the tiny basement osterias where grandma is still rolling the pasta by hand. Order the daily special, drink the house wine, and embrace the slow, beautiful rhythm of local life.
Staying Safe and Handling Unexpected Road Challenges
No matter how efficiently you pack, things will occasionally go wrong on the road. Traveling solo means you must be your own risk manager, problem solver, and emergency responder. Handling challenges with grace is where your real personal growth happens.
Preparing for Minor Incidents
Keep a very basic first-aid kit inside your daypack. You do not need a massive trauma box. A few high-quality blister bandages, some antiseptic wipes, anti-diarrhea tablets, and a small tube of antihistamine cream for bug bites are all you need. Most minor medical issues can be handled by a quick visit to a local neighborhood pharmacy, which is often an interesting cultural experience in itself.
The Value of Specialized Travel Insurance
Never hit the road without high-quality travel medical insurance. It is the one thing you can pack that doesn’t take up any physical space but can save your life.
For reliable medical coverage, emergency evacuation services, and 24/7 support while exploring remote regions, look into tailored plans through the World Nomads Travel Insurance platform to protect yourself against unexpected accidents or sudden illnesses abroad. Having a solid policy allows you to take calculated risks and explore with confidence, knowing that you are protected if a major emergency occurs.
Maintaining Your Minimalist Gear on Long Journeys
If you are traveling for a month, three months, or a year, you do not need to pack more clothes than you would for a single week. You simply need a sustainable system for keeping your limited gear clean and functional.
The Art of Sink Washing
You can wash your clothes easily in any hotel or hostel sink. Fill the sink with warm water, add a few drops of biodegradable liquid travel soap, and submerge your clothes. Agitate the fabric vigorously with your hands for a few minutes, focusing on the underarm and collar areas. Rinse thoroughly with clean water.
To dry your clothes twice as fast, use the towel roll trick. Lay a clean, dry bath towel flat on your bed. Place your freshly washed clothing flat on top of the towel. Roll the towel up tightly with the clothes inside it like a sleeping bag. Stand on the rolled towel and stomp back and forth with your feet for thirty seconds. The dry towel will absorb eighty percent of the moisture from the clothes. Hang the garments up on a portable travel clothesline near an open window or fan, and they will be crisp and dry by morning.
Utilizing Local Laundromats
Every few weeks, treat yourself to a visit to a local neighborhood laundromat. It is a fantastic window into the daily life of a community. In many parts of the world, you can drop your bag of clothes off at a local laundry service in the morning and pick it up in the evening, washed, dried, and beautifully folded for just a few dollars. This supports the small local economy and gives you a wonderful break from your daily travel routine.
Conclusion: The Freedom of Carrying Less
When you learn how to pack efficiently for any trip, you realize that you need far less than society tells you to buy. You begin to understand that the value of your journey is not measured by the number of outfits you wear or the luxury items you display. It is measured by the conversations you have, the challenges you overcome, and the quiet moments of self-awareness you find along the way.
As you stand over your bag preparing for your next solo adventure, look at every single item and ask yourself: “Will this object enhance my experience, or will it hold me back?”
Choose the freedom of a light bag. Choose the agility to change your plans at a moment’s notice. Choose to trust your own ability to handle whatever the road throws at you. The world rewards courage, curiosity, and a light load. Pack your bag, step out the door, and start creating your own meaningful journey. You are completely capable of handling the road ahead.